How to track mileage on iPhone: five steps
- Choose automatic or manual tracking. A background mileage app can reduce forgotten starts, while explicit Start and Finish controls give you more control over a particular drive.
- Check iPhone permissions. In Settings, review Location Services and Motion & Fitness access for the app. Automatic tracking behavior depends on the permission model used by that app.
- Test with a short drive. Review the saved trip's date, distance, route and duration. GPS accuracy and background detection can vary.
- Separate work and personal trips. Review classifications instead of assuming every recorded drive qualifies as business mileage.
- Review weekly or monthly totals. Compare summaries with the individual trip history and correct omissions while you remember the details.
MileFree's public iPhone beta is available through Apple TestFlight; the first App Store release is still being prepared. Read the commitment to keep the entire mileage app free.
Searching for a free mileage tracker for iPhone sounds simple until you start comparing apps. Some focus on automatic driving detection, some emphasize business mileage history and summaries, and others are really expense platforms with mileage added on top.
The useful question is not just “Is it free?” It is: Will it reliably fit the way you actually drive and keep records? Before installing a mileage tracker, check the seven areas below.
Check mileage tracking accuracy with real drives
Before relying on any automatic mileage app, compare what happened on the road with what appeared in your trip history. This is a repeatable personal check, not a claim that MileFree has passed a formal accuracy test.
- Choose varied trips. Try a short errand, a longer drive, a working day with multiple stops, and a trip while the phone stays locked. Write down when each drive began and ended.
- Check iPhone permissions. Review Location Services and Precise Location for the app, along with the motion permissions it asks for. Some background behavior varies with iOS settings and conditions.
- Capture a rough reference. If safe and practical, note your car odometer at the start and end of each individual drive. Odometer difference is a useful comparison, but it is not a laboratory-grade GPS reference.
- Compare the records. For every drive, check whether the app created a trip, its start/end times, distance and category. Record missed trips, duplicates and wrongly merged or split drives.
- Repeat and protect privacy. Repeat over several days before drawing conclusions. Remove client addresses, home locations and identifiers from any screenshots you share.
Apple’s guide to iPhone Location Services ↗
A difference between app mileage and vehicle odometer readings does not, by itself, identify which measurement is correct. Do not present test scenarios as actual MileFree results unless they were measured.
1. Automatic mileage tracking should reduce manual work
The biggest reason to use a mileage tracker app is to stop writing down every drive by hand. A good automatic mileage tracker should be designed to detect driving in the background when the required iPhone permissions are enabled.
That does not mean every trip should be accepted blindly. You should still be able to review history, confirm what was recorded and correct a trip when necessary. Automatic recording is most useful when it handles the repetitive part while leaving the final classification under your control.
2. Your mileage log should be easy to review
A mileage log becomes valuable only if you can understand it later. Look for a history that keeps basic trip information together: date, start and end time, distance, duration and category.
If you drive for both work and personal reasons, the app should let you keep Business and Personal mileage separate without forcing you to maintain two different systems. Date filters are also important. Reviewing one month should not require scrolling through your entire driving history.
MileFree features shown in this article
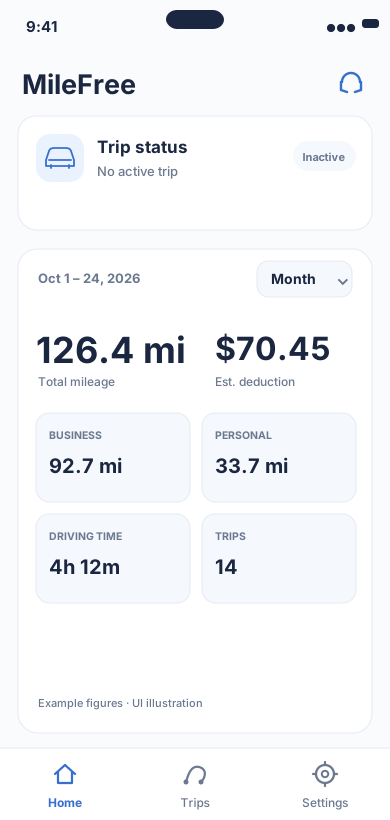
Current mileage and tracking status.
Flutter UI: HomeScreen / SummaryCardOpen larger preview ↗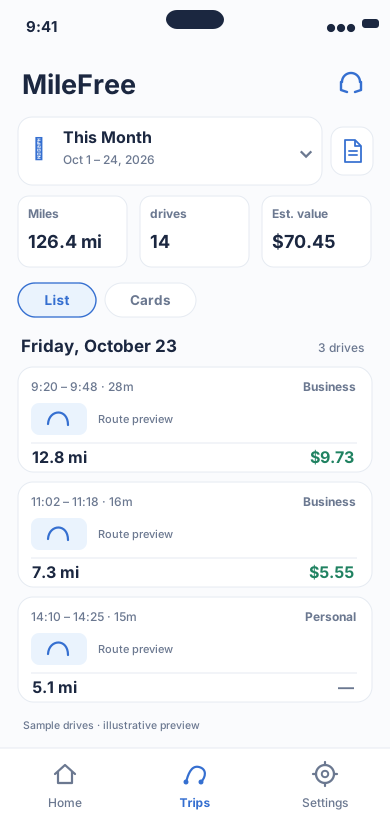
Date range, miles, drives and reviewable trip history.
Flutter UI: HistoryScreenOpen larger preview ↗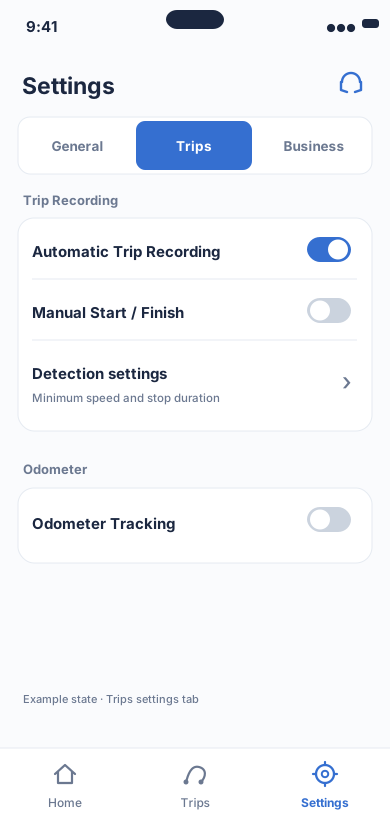
Tracking permissions and controls.
Flutter UI: ModernSettingsScreenOpen larger preview ↗Illustrative previews based on the app interface, with example data. These are not actual iPhone screenshots; the design may change. Preview text is in English.
3. History and summaries matter more than a pretty dashboard
A dashboard is useful for a quick glance, but the real test is whether you can return later and understand what happened. A mileage tracker should make it simple to select a period, review the trips already in history and see clear totals.
Useful summaries should stay tied to the underlying trip history. Date ranges, Business / Personal categories, driving time and trip count are easier to trust when you can review the individual drives behind the totals.
Before choosing an app, check exactly what its free plan includes. Some apps may limit automatic tracking, history depth, filters or other everyday features behind a paid plan.
4. Check where your mileage data is stored
Mileage data can reveal patterns about where and when you drive, so privacy deserves more attention than a generic “secure” badge.
Ask practical questions: Does the app require an account? Does normal use require cloud synchronization? Is trip data stored locally on the iPhone? Is there a clear privacy policy that explains what happens to location and motion data?
An app can still use normal iOS services and third-party software libraries, but its privacy explanation should clearly separate core trip data from unrelated website analytics, advertising or marketing systems.
5. iPhone permissions should be explained clearly
Automatic mileage tracking usually depends on iOS permissions such as Location Services and Motion & Fitness. Background App Refresh can also matter, depending on the tracking approach.
Open Settings → Privacy & Security → Location Services and review the app's location permission. If motion activity is used, review Settings → Privacy & Security → Motion & Fitness as well. Available options differ by iOS version and application; follow the app's permission instructions.
Changes to location access, weak GPS signals, power management or interrupted background activity can affect saved trips. Check your actual trip history rather than assuming that automatic mileage detection always succeeds.
A trustworthy mileage tracker should explain why each permission is requested. If you disable the permissions needed for automatic detection, the app should not pretend that automatic tracking will continue normally.
6. “Free” should be specific
Free mileage tracker apps can use very different models. One may limit the number of automatically tracked trips. Another may restrict history or advanced features. Another may start free and add optional paid features later.
So do not judge only by the word free in an App Store listing. Check what is included in the version you are installing: automatic trip recording, history, Business / Personal categories, summaries and any monthly limits.
7. Pick the simplest app that covers your real workflow
You may not need a full accounting platform just to keep a mileage log. If your normal workflow is “drive, review, classify, check totals,” an app focused on those jobs may be easier to live with than a larger system full of features you never use.
On the other hand, if you also need invoicing, expense scanning, payroll or team fleet management, a broader platform may be the better choice. The best mileage tracker is the one that matches the job you actually need done.
Quick checklist for choosing an iPhone mileage tracker
- Automatic trip recording when enabled
- Manual trip controls as a backup
- Business and Personal classification
- Useful date filters and summaries
- Clear mileage summaries tied to trip history
- Plain-language permission explanations
- A privacy policy that explains storage and data handling
- Clear limits on the free version
Easy. Completely Free. Safe.
MileFree is available in public iPhone beta through Apple TestFlight, while the first App Store release is still being prepared. The current build includes automatic and manual trip recording, Business / Personal mileage, date-based summaries and odometer history. Core trip, odometer and preference data is stored locally in the current build, and a MileFree account is not required. MileFree's FULL FREE commitment means no Premium tier, subscription or monthly trip cap.
Automatic vs manual mileage tracking on iPhone
Automatic tracking is convenient for a day with several trips because it reduces the need to remember Start before each drive. But it still needs reviewing and might miss a trip. Manual tracking lets you deliberately start and finish a trip, but it relies on your remembering to do so.
If you use mileage records for a tax deduction or reimbursement, recording only distance may not meet the documentation rules that apply to you. Keep trip purpose or other supporting records when required. For U.S. federal tax information consult IRS Publication 463; this article is not tax advice.
Final thought
A free mileage tracker is worth using when it removes friction from record keeping. Prioritize automatic tracking, a readable mileage log, useful summaries, transparent permissions and clear privacy choices. Everything else is secondary.